 I’ve used AWS Lambdas before, but never have I integrated Slack with Lambdas…until now. We use Slack a lot, and with it we are adding integrations to improve team communications and visibility. We also use AWS Cloudformation which allows us to quickly and repeatedly launch entire environments. The templates are independent, which allows developers to deploy the same template numerous times. This is great, as it allows teams to work in their own environments. This can all lead to CloudFormation stack sprawl, or a lot of stacks that run unused with a lack of ownership. Which indirectly has potential to increase the AWS bill over time.
To help alleviate the clutter as well as reduce AWS costs, I decided to create the CF-Stack-Killer, a set of Lambdas that will help remove stacks at the end of the day with a Slack integration containing an interactive message button that allows a user to postpone the stack deletion. The process goes like this:
1. A Lambda sends message to Slack channel stating which stacks will be deleted based on a query.
2. The Slack message contains a button, ‘do not delete’, which a developer can request to retain the specified stack.
3. A final Lambda deletes any stacks that have not been requested to retain and sends a notification to Slack.
Example of the Slack messages

Here’s a workflow diagram to help show the process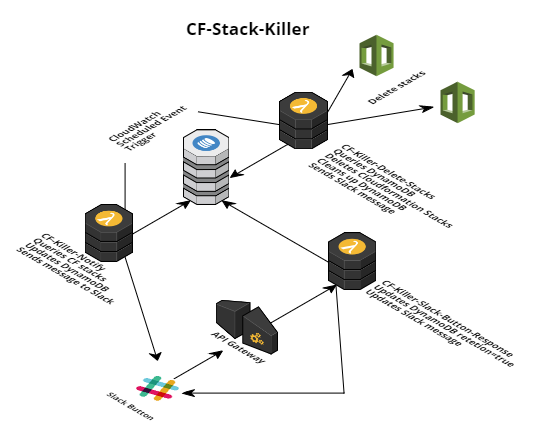
The process actually includes 3 Lambdas that interact with DynamoDB and Slack.
CF-Killer-Notify (triggered by a Cloudwatch scheduled event)
- Queries the Cloudformation Stacks based on a string pattern, ie ‘POC’, or ‘DEV’
- Saves the StackNames matching the pattern to DynamoDB, and adds a key: retention=false
- Sends a message to Slack notifying the Channel that the Stack will be deleted. This message includes an interactive button, that sends a request to an AWS API Gateway.
CF-Killer-Slack-Button-Response (triggered by the interactive button, ‘do not delete’, in the Slack message)
- The Slack App sends a request to the request URL in the app configuration, which points to AWS API Gateway
- API Gateway then triggers the CF-Killer-Slack-Button-Response lambda
- The lambda updates the DynamoDB for the corresponding stack name and setting retention=true
- The lambda then updates the Slack message to display which user authorized the change and showing that the stack will not be deleted
CF-Killer-Delete-Stacks (triggered by a Cloudwatch scheduled event)
- Queries the DynamoDB table
- If retention=false, it deletes the corresponding stack
- Finally, it removes all records from the DynamoDB table
I’l try to describe to my best the process of how to set this up and configure it for your own use.
1. Create the Slack Application
We need to create a Slack App, which allows our Lambdas to communicate to Slack. For more information about making Slack Apps visit this site: https://api.slack.com/slack-apps
Provide a name for the App and choose your Slack Team

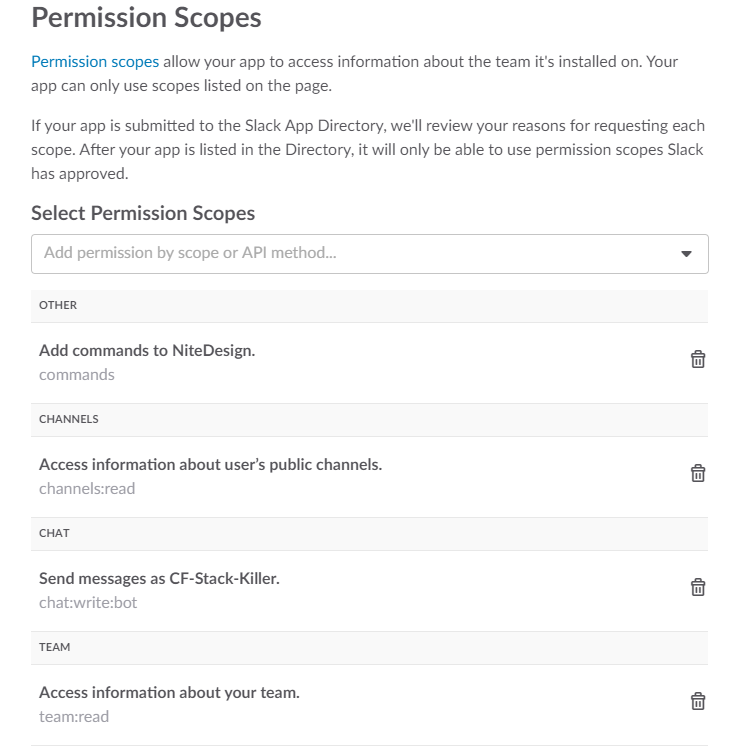
Go to the OAuth & Permissions section and provide your application the following permissions:
commands
channels:read
chat:write:bot
team:read
It should look like this:
Activate Incoming Webhooks and then Add New Webhook to Team
Select which Channel the app webhook will post to and then Authorize. You should have a new Slack Webhook URL which we will use later when we configure the Lambdas.
The Lambdas will require the following parameters to post to Slack, which we can obtain by submitting a POST request to Slack. I like to use Postman for this, you can download it here: https://www.getpostman.com
slackTeamID
slackChannelID
slackDomain
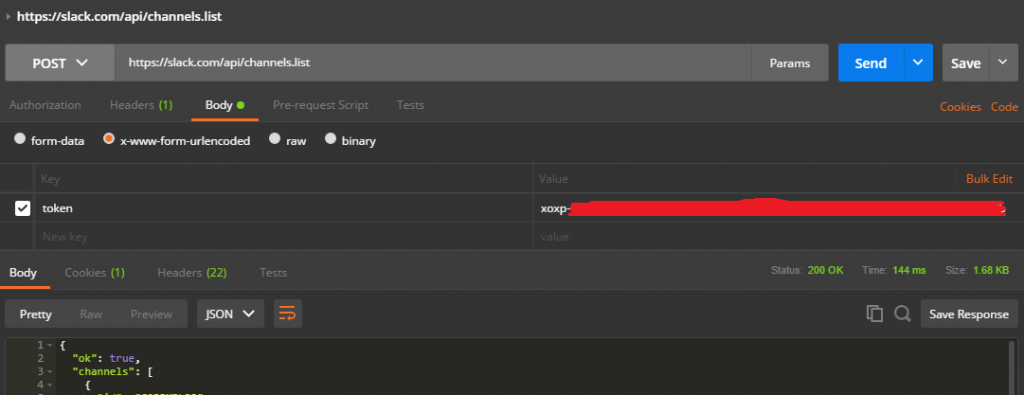
To get the slackChannelId, send a POST request to https://slack.com/api/channels.list
Include a body of type x-www-form-urlencoded with
key: token
value: xoxp-1111111111-22222222222-333333333333-abcdefgh1234567890abcdefgh12345
The token value is found in the Slack App settings under OAuth & Permissions
The Postman setup should look similar to this:
You should then receive a response containing data. Locate the Slack Channel and save the id to use when deploying the CloudFormation stack.
To get the slackTeamID and slackDomain, send a POST request to https://slack.com/api/team.info
Use the same body, key and token as the request above.
This will return your team id and domain, and save both for later.
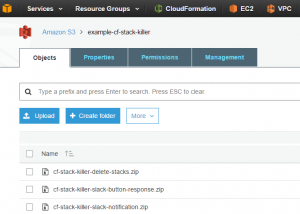
2. Copy and Zip the Lambda code to an S3 bucket
In order for the CloudFormation template to properly build the Lambas, each lambda code must be zipped and uploaded to an S3 bucket. The latest code can be found here: https://github.com/NiteDesign/CF-Stack-Killer
NOTE!! You may want to modify the Slack message that indicates what time the stack will be deleted to your use case:
"text": stack + " stack will be removed at 5:00pm"
Zip each file individually and upload to an S3 bucket of your choice, naming the zip the same as the file name.
3. Deploy the CloudFormation stack
All the AWS resources can be created by deploying this CloudFormation template. You will need to provide the appropriate parameters when launching it, ie channelId, s3 bucket name, etc.
The template can be found here: https://github.com/NiteDesign/CF-Stack-Killer
NOTE!! The CFKillerDeleteStacksRole resource should be updated in the template to grant the required permissions in your environment to properly delete the CloudFormation stack resources. This will vary, and I didn’t want to provide the role FULL access to delete all resources. Please update the template for your use-case.
Create a new CloudFormation stack using the template file. Provide the parameters for your environment.
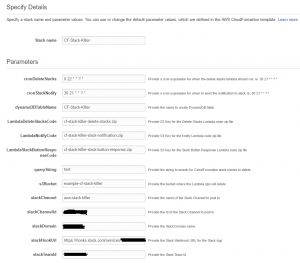
All other options can be left as is.
Once launched, this will create the following AWS Resources
API Gateway – CF-Stack-Killer
CloudWatch Event Rules – CF-Killer-Slack-Notify and CF-Killer-Delete-Stacks
DynamoDB Table – this will vary based on the parameter name provided when the stack is launched
IAM Roles – CF-Killer-Notify and CF-Killer-Delete-Stack
Lambda Functions – CF-Killer-Notify, CF-Killer-Slack-Button-Response, and CF-Killer-Delete-Stacks
I initially had some trouble with the API Gateway and the templates, but found some guidance from a post by Chris Kalafarski which provides some details about integrating Slack with AWS, here is the original post for additional reference: https://medium.com/@farski/learn-aws-api-gateway-with-the-slack-police-ca8d636e9fc0
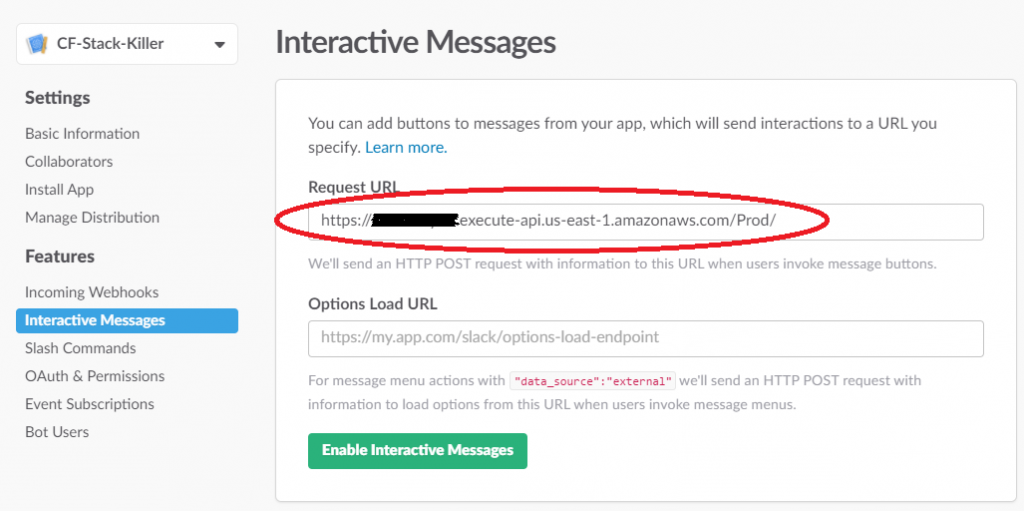
4. Enable Interactive Messages for the Slack App
We now need to enable the Interactive Messages for the Slack App, this tells Slack where to send the request when the ‘do not delete’ button is pressed in the Slack message. We first need to get the API Gateway Invoke URL. Within AWS, browse to the CF-Stack-Killer API and then Stages.
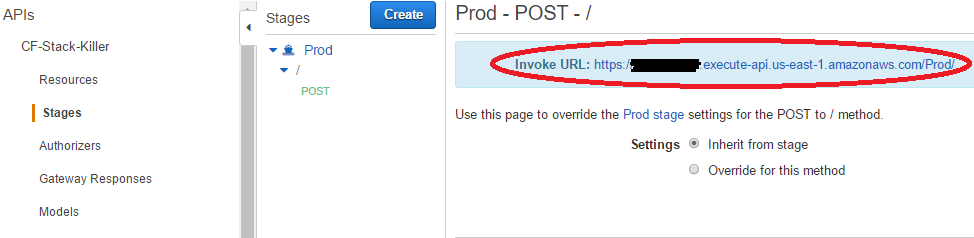
Copy the Invoke URL into the Slack App ->Interactive Messages -> Request URL
That’s it, you are done! You should now have an entire process that will terminate your development stacks at a scheduled time, as well as allowing for developers to postpone when needed vi a Slack integration.
Thanks again to Chris Kalafarski and his post https://medium.com/@farski/learn-aws-api-gateway-with-the-slack-police-ca8d636e9fc0 about the API Gateway.
Disclaimer: All data and information provided on this site is for informational purposes only. www.nitedesign.com makes no representations as to accuracy, completeness, currentness, suitability, or validity of any information on this site and will not be liable for any errors, omissions, or delays in this information or any losses, injuries, or damages arising from its display or use. All information is provided on an as-is basis.